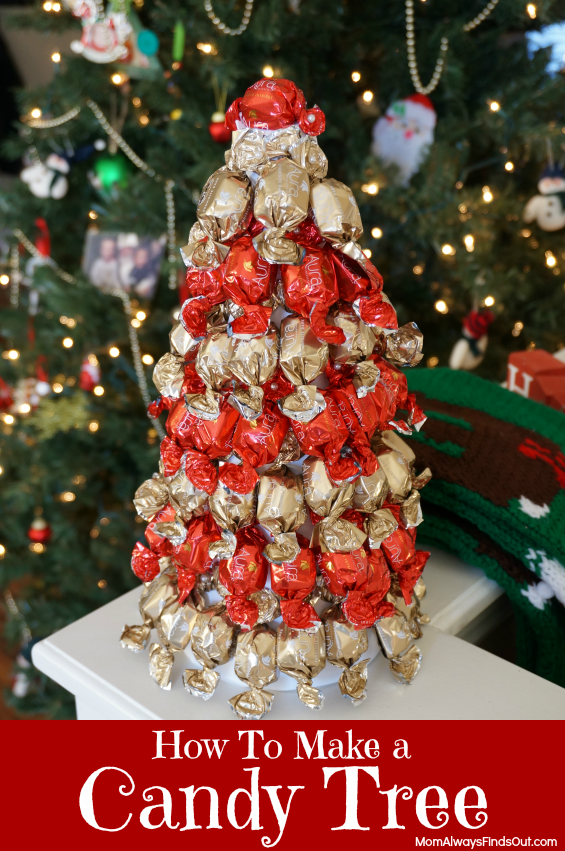
A candy tree is what I like to call functional holiday decor. It’s an easy way to pretty up your table, plus invites people to take a sweet treat all season long. My family enjoys our delicious chocolate truffle tree.
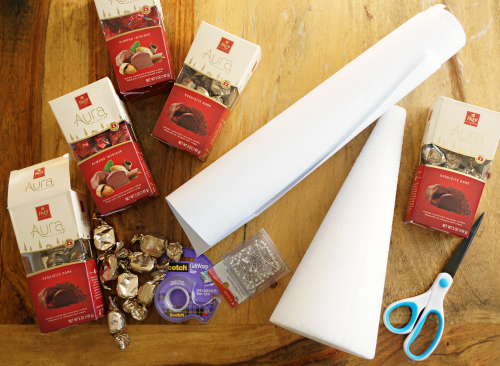
I bought tall styrofoam cones on an after Christmas sale last year just so I could make candy trees this year. Once the candy is all gone, the cones will be ready to use again as candy trees or some other crafty purpose.
I think it could be fun to get big and small foam cone forms and make a mini candy tree forest. All you need to make a candy tree is the styrofoam cone, wrapped candy and straight pins with a round head. I covered the cone with plain white paper, but you could use wrapping paper or even fabric to cover the foam. It looks nicer to have a covered cone once people start taking the candy off.
You’ll have to make a guess at how many piece of candy it will take to cover your tree. The bigger the foam cone tree form, the more pieces it will take to cover. My tree form measures almost 12 by 4 inches and took 5 (5 oz.) boxes of Chocolat Frey chocolates. That’s about 75 individually wrapped truffles. It is important to use candy that has a wrapper that twists on both ends because you’ll be pinning the candy to the tree by poking a pin through the end of the wrapper.
How To Make a Candy Tree
Materials Needed
- Styrofoam Cone
- Straight Pins with Round Heads (mine were Pearl Head Pins)
- Paper (to cover cone)
- Candy (individually wrapped)
Directions:
1. Cover the styrofoam cone with paper (or fabric.)
2. Starting at the base of the cone, use a straight pin to attach a piece of candy to the cone. Stick the pin through the top twisted part of the candy wrapper and push the pin all the way into the styrofoam until it stops at the pin’s ball head. Continue to pin candy all the way around the cone in a single, straight layer.
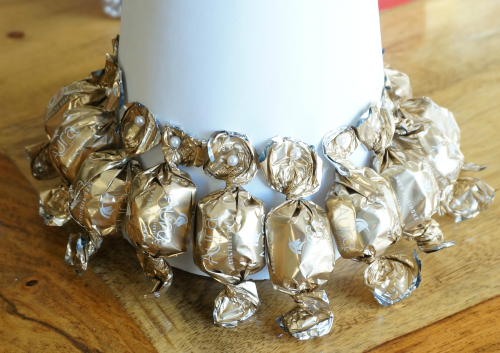
3. Once you have finished going around the cone, start a second pinning row of candy above the layer you just finished. Repeat this step until you get to the top of the cone. Pin a piece of candy at the very top, using one pin on each side of the wrapper so it lays flat. (The styrofoam cone I used has a flat top, not pointed.)

Once your tree is completely covered in candy, it is ready to display (and eat!) To remove a piece of candy, simply pull on the pinned wrapper. The candy will come right off the tree.
Remind people to stick the empty pins back into the tree – the styrofoam cone is a handy pin cushion! I know it’s probably common sense, but if you have children with access to the candy tree, please supervise them around the pins.
For more ideas for how to display holiday chocolates, check out my 12 Days of Christmas Chocolate Gift Tower and DIY Magnetic Matchbox Advent Calendar.
What kind of candy would you use to make a candy tree?


Lorelai @ Life With Lorelai says
Oh, YUM! What a fun idea. The candy tree so so pretty too. 🙂 #HomeMattersParty
~Lorelai
Life With Lorelai
Marisa says
I love fun and easy projects like this! I’ll definitely be pinning for later! Thanks for sharing! #homemattersparty
Crystal Green says
That’s such a cute idea. I’ve never heard of this kind of candy, but the wrappers on them make them look fancy.
Nicole says
Thank you, Crystal. Chocolat Frey is new in the USA but has been around in Switzerland forever. 🙂 It is really, really good! I have even had a few of my kids’ friends who come over and get a piece notice the taste difference and ask me what kind it is so they can tell their mom to buy it. LOL
Michelle James says
This is such a fun project Nicole! Merry Christmas! #homemattersparty
sahana says
Your Candy tree looks fabulous with red and gold candies. #HomeMattersParty
Nicole says
Hi Sahana, Thank you so much for the compliments! 🙂 –Nicole